
Pre-Shampoo Oiling: The Protective Step Before Washing
Pre-shampoo oiling is one of the simplest ways to reduce wash-day dryness, protect fragile lengths, and support smoother, softer hair over time.
Pre-shampoo oiling does not stimulate new hair growth or treat medical hair loss. Its purpose is hair retention: reducing dryness, friction, and breakage so the hair you already grow is better preserved.
What Is Pre-Shampoo Oiling?
Pre-shampoo oiling means applying oil to the lengths and ends of your hair before washing — a simple protective step with real benefits for dryness and breakage.
Protects against over-stripping
Shampoo removes oil and buildup — but on already-dry lengths, this cleansing can leave hair rough and brittle. Oil creates a buffer before the wash begins.
Reduces friction during washing
Oil helps hair glide more smoothly through wash day, reducing the mechanical stress that causes breakage — especially when detangling wet hair.
Improves softness and manageability
Hair that retains more moisture during cleansing tends to feel softer after drying, with better slip and less frizz to manage.
Mid-lengths to ends — not the scalp
Apply oil to the mid-lengths and ends. Heavy scalp application is a separate practice — mixing the two approaches can lead to buildup and irritation.
“Pre-shampoo oiling is not about making hair greasy. It is about creating a protective buffer before cleansing.”
See the Oiling Step in Action
Abbey Yung explains exactly how and why pre-shampoo oiling works — straight from her TikTok.
How Pre-Shampoo Oiling Works
Four distinct ways the oiling step protects hair during the cleansing process.
Reduces moisture loss
Shampoo strips oil and buildup, but can also leave already-dry lengths feeling rough. Oil buffers this cleansing effect without preventing the shampoo from working.
Improves slip
Oil creates a surface layer that reduces friction when washing and detangling, making knots easier to work through without snapping strands.
Protects damaged ends
The oldest hair at your ends is the most porous and fragile. Pre-shampoo oil offers extra protection right where hair is most vulnerable to breakage.
Supports length retention
Less dryness and breakage per wash cycle adds up over months. Consistent protection means more of your hair’s growth is visibly retained at the ends.
How to Do the Pre-Shampoo Oiling Step
A straightforward routine addition that takes five minutes to apply and requires no specialist tools.
“Fine hair may only need a tiny amount and shorter contact time. Thick, coarse, curly, bleached, or high-porosity hair may tolerate more oil and benefit from longer contact.”
Best Oils for Pre-Shampoo Oiling
Choosing the right oil matters — especially for fine or low-porosity hair that gets weighed down easily.

OGX Coconut Miracle Oil
Rich in coconut and tiare essences. A solid choice for dry, frizzy, or damaged lengths that need extra protection before cleansing.
- Apply to mid-lengths and ends before shampooing
- Medium-rich texture — easy to distribute
- Good for hair that feels rough after shampooing
- Widely available and affordable entry point
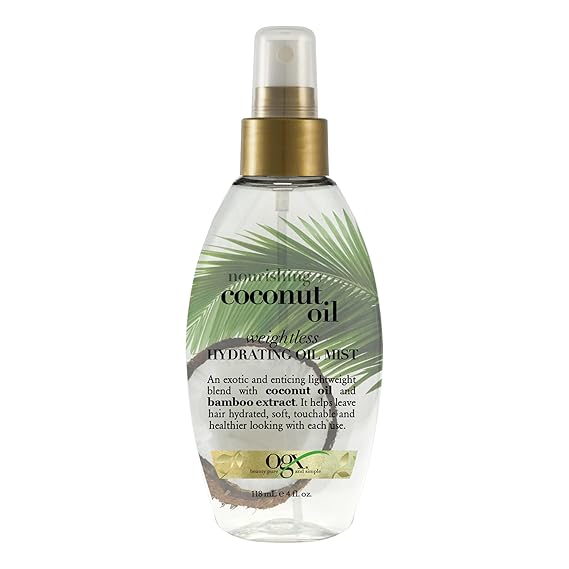
OGX Coconut Oil Weightless Hydrating Oil Mist
A lightweight spray format that is much easier to apply in controlled amounts. Ideal for finer hair or anyone who finds liquid oils too heavy to manage without greasiness.
- Mist format allows precise, even application
- Lightweight — less risk of weighing hair down
- Shorter contact time typically sufficient
- Good starting point for those new to pre-shampoo oiling

OGX Coconut Milk Anti-Breakage Serum
A medium-weight option focused on softness and shine. A good all-round choice for mid-lengths that need hydration and slip.
- Lightweight serum format — easy to apply evenly
- Adds slip and softness before cleansing
- Good for colour-treated or bleached hair
- Pairs well with a moisturising shampoo
Product Comparison Table
A quick reference for choosing the right oil for your hair type and pre-shampoo routine.
Pre-Shampoo Oiling Products — At a Glance
| Product | Best for | Texture | Use before shampoo? | Notes |
|---|---|---|---|---|
| OGX Coconut Miracle Oil | Dry / damaged hair | Medium-rich | Yes | Good for lengths and ends |
| OGX Coconut Oil Mist | Fine hair | Lightweight | Yes | Easier to avoid greasiness |
| OGX Coconut Milk Oil | Softness / shine | Medium | Yes | Good all-round option |
| Pure coconut oil | Coarse / high-porosity hair | Heavy | Yes | Can be too heavy for some |
| Argan oil | Frizz / smoothness | Medium | Yes | Good for ends |
Who Should Try This Step?
Pre-shampoo oiling suits certain hair types much better than others. Here is how to assess where you fit.
Common Mistakes with Pre-Shampoo Oiling
A few common errors that reduce the benefit or cause new problems.
Using too much oil
More oil is not better. Excess causes buildup, makes hair harder to rinse, and leaves lengths feeling flat or waxy after drying.
Applying heavy oil to the scalp unnecessarily
Scalp oiling is a separate practice with different goals. Applying thick oil to the scalp as part of pre-shampoo treatment can cause irritation or clog follicles in sensitive scalps.
Not shampooing thoroughly enough
The pre-shampoo step only works if followed by a proper cleanse. Residual oil can make hair feel flat, heavy, or coated — especially on fine hair.
Expecting hair growth
Pre-shampoo oiling is a retention and protection step — not a follicle-growth treatment. It preserves the hair you already have; it does not stimulate new growth.
Using it every wash when not needed
If your hair responds well and does not feel dry after cleansing, you may not need this step every session. Adjust based on how your hair actually feels.
How Often Should You Pre-Shampoo Oil?
There is no single correct frequency — use your hair type as a starting point, then adjust from there.
Every 1–2 weeks
Or apply only to the ends. Use a lightweight mist rather than a heavier oil. Shorter contact time — 15 minutes is usually sufficient.
Once weekly
A standard starting frequency. Adjust based on seasonal dryness, heat tool use, or how often you wash.
Once or twice weekly
Most likely to benefit from regular oiling. Can usually tolerate heavier oils without becoming limp.
Once or twice weekly
High-porosity, chemically damaged hair loses moisture quickly and may benefit from consistent pre-treatment each wash.
Lengths and ends only
Focus application well below the roots. Avoid the scalp entirely to prevent excess buildup and potential irritation.
Where This Fits in the Abbey Yung Method
Pre-shampoo oiling is Step 2 of the 11-step Abbey Yung Method. View the full Abbey Yung Method →
Step 2 of 11: Pre-Shampoo Oiling
Bond repair and oiling do not always need to be done together every wash day. On lighter wash days you may choose to do one or neither — adjust based on your hair’s current needs.
Retain It. Keep It.
Hair growth and hair retention work together. Pre-shampoo oiling is how you protect more of what grows.
Pre-Shampoo Oiling FAQ
Common questions about pre-shampoo oiling and how it fits into the Abbey Yung Method.
Does pre-shampoo oiling help hair grow?
Not directly. Pre-shampoo oiling helps reduce breakage and dryness during wash day, which can support length retention over time. This means more of your natural hair growth is preserved — but the oil itself does not stimulate follicles or speed up growth.
Should I oil my scalp or just my ends?
For most people, the lengths and ends are the safest and most effective starting point for pre-shampoo oiling. Scalp oiling is a separate practice with different goals. Applying oil directly to the scalp before shampooing can lead to buildup or irritation in sensitive scalps.
Can fine hair use pre-shampoo oil?
Yes — but fine hair needs a lighter approach. Start with a very small amount, choose a lightweight oil or spray mist rather than a heavier liquid oil, and focus application only on the ends. Fine hair is more prone to becoming limp or greasy, so less is almost always more.
How long should I leave oil in before shampooing?
For most routines, 15 to 60 minutes is sufficient. There is no need to leave oil on for several hours or overnight — shorter contact time is usually enough for the protective benefit before cleansing.
Can I leave oil in overnight?
Some people do leave oil on overnight and find it beneficial, but it is not necessary for most hair types. Overnight oiling may cause scalp irritation, make hair harder to fully rinse, or transfer to pillowcases. If you try it, protect your bedding and ensure you shampoo thoroughly in the morning.
Should I oil before every shampoo?
Not necessarily. This step is most useful when your hair is dry, damaged, or prone to breakage during cleansing. If your hair feels fine after washing without the oil step, you do not need to add it every session. Adjust based on dryness, styling habits, and how your hair responds.
What is the best oil for pre-shampoo oiling?
Coconut oil, argan oil, and lightweight oil blends are the most commonly used options. The best choice depends on your hair type: heavier oils work well for thick, coarse, or high-porosity hair; lighter oils and mists suit fine or low-porosity hair better. Start with whatever you have on hand and see how your hair responds.
Next Steps in the Method
Pre-shampoo oiling is one part of a complete hair health strategy. Explore the other steps below.
The Full Abbey Yung Method
The complete step-by-step framework covering all steps of Abbey Yung’s wash day routine — from pre-shower prep to between-wash care.
Pre-Shampoo Bond Repair
Strengthen fragile, damaged hair before cleansing. The step before oiling — covering Epres, K18, Olaplex, and the sandwich method.
Hair Growth Shampoo
Clarifying formulas, scalp-focused shampoos, and how shampoo choice affects the overall results of your oiling and bond repair steps.
Hair Care Routines
Structured, practical routines that combine the right methods in the right order — built around your hair type, goals, and lifestyle.
Where Pre-Shampoo Oiling Fits In The Abbey Yung Method
Step 2 is an optional preparation step performed before your clarifying or non-clarifying shampoo. The Abbey Yung Method has 11 steps in total; you do not need every step every wash day.
Not every wash day requires all steps. Steps marked optional can be skipped based on your hair’s needs.
Independent educational resource. Hair Growth Hub is an independent publisher and is not affiliated with, endorsed by, or sponsored by Abbey Yung or any product brand mentioned on this page. Content is provided for general educational purposes only and does not constitute medical advice. Always patch-test new products and consult a dermatologist or trichologist for persistent scalp or hair concerns. Questions about this page? Contact us at hello@hairgrowthhub.fi.
Not Sure Which Products Are Right For You?
Take the two-minute Hair Quiz to get a personalized routine based on your hair type, goals and budget — or browse every step of the Abbey Yung Method.